


A Beginner's Guide to Interrail

Welcome to Interrail! Maybe this is your first time learning about Interrail and European train travel — or maybe you've travelled with an Interrail Pass a few times before but need a refresher. Either way, you’ve come to the right place.
Here you'll find an exhaustive breakdown of every step of the Interrail process. But before we dive into the ins and outs of how Interrail works, let’s start with a basic question:
What is Interrail?
The Interrail Pass is an all-in-one rail Pass you can buy to travel by train all across Europe. With over 30,000 destinations in 33 countries included in the Interrail Pass Network, you can design an adventure that is uniquely tailored to you.
Interested in travelling with an Interrail Pass? We put together this first-timers manual to be a resource as you plan your trip, choose the Pass that’s right for you, set up your Rail Planner app and embark on your adventure.
Tip: We recommend bookmarking this page, so you can refer back to it anytime you have a question.

Step 1: Where will you go with Interrail?
Start by dreaming about where you’d like to go by train in Europe. Whether you want to go on a hiking adventure in the Alps or take it easy while exploring small seaside towns along the Mediterranean, your Interrail Pass will get you there.
For inspiration, check out our magazine — or hop over to our Community to browse unforgettable routes and find advice from fellow travellers.
Want to keep things open and flexible for the time being? That’s cool, too. On your travel days, you can hop on and off trains as you like, changing your plans last-minute if you hear about a secret beach or nearby village you’d like to visit. There’s just one exception: travelling on a train that requires seat reservations (more on this in later steps!).

Step 2: Planning your route
Once you have a rough idea of where you’d like to go, it’s time to plan your route. You can use our Trip Planner to visualise your route between destinations and see where your Interrail Pass can take you.
Don’t worry, you don’t need to follow this exact route while you travel — you can freestyle it the day of, if you want — but it’s important to know whether or not you will need to buy seat reservations ahead of time.
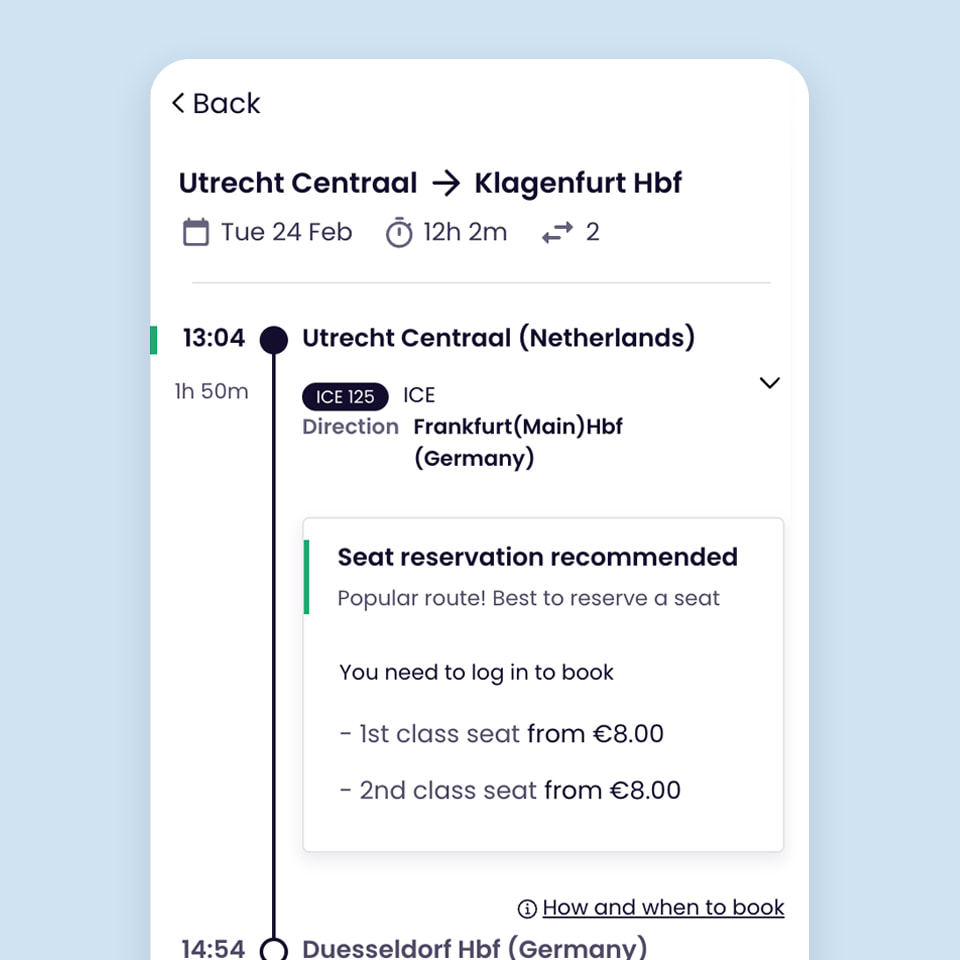
You can travel on most trains in Europe with only your Interrail Pass, but some require Passholders to purchase an additional seat reservation. If you end up travelling on routes that require reservations, you’ll need to show both your seat reservation and your Pass (specifically your day ticket, comprised of a barcode and train details generated for each day of travel) to ticket checkers.

Step 3: Choose your Interrail Pass
After building your route on our Trip Planner, you'll see our recommendation for which Pass would be best suited for your adventure.
You can choose from the following Passes, each offering a fixed number of days on which you can use your Pass to travel by rail. Flexi Passes offer a certain number of travel days to use in a set amount of time (4 days in 1 month, for example), while Continuous Passes allow you to travel each day of set time period, such as 15 days or one month.
Global Pass: Travel across 33 countries – from buzzing cities to cosy villages, mountain towns to seaside hideaways.
One Country Pass: Pick one country and really get to know it – explore both the highlights and hidden gems only locals know about.
Plus Pass (Beta): Travel with all the perks of an Interrail Pass, plus the cost of seat reservations covered for most trains in Europe.
Note: Are you travelling with a paper Pass instead of a mobile Pass? Your set-up process will be a little different. Here’s everything you need to know about travelling with a paper Pass.
Step 4: Get your seat reservations
As mentioned earlier, you can hop on most trains in Europe with just your Pass. But some high-speed, international and night trains require purchasing seat reservations in advance at an extra cost in order to board.
After you purchase your Pass, use our Timetable to check whether the routes you plan to take require a seat reservation. Each train will indicate if seat reservations are required and how to book them. To find trains you can board without seat reservations, simply use the “No seat reservation required” filter.
You can book your seat reservations using our Timetable or through the railway carriers' website. Book any required seat reservations well in advance — popular routes, such as the Eurostar to/from Paris or London, TGV train from Paris to Barcelona and Eurocity trains from Milan to Zurich, tend to sell out fast.
Step 5. Set up your Rail Planner app and get ready to travel
Here’s a quick checklist of things to do before you begin your Interrail trip:
If you’re travelling from outside of Europe, check to see if you need a visa for your destinations and apply for it in time for your trip.
Take a look at the discounts on travel insurance, hostels, luggage storage, sightseeing tours, ferries and more available to you exclusively as a Passholder. They’ll help you save money as you explore Europe with your Pass.
Are you a traveller with reduced mobility? Learn how you can access passenger assistance and reservations before and during your trip.
Packing tip: Europe is best experienced when you pack light, so we recommend bringing a carry-on or backpack you can easily take with you and using luggage storage options when you need them.
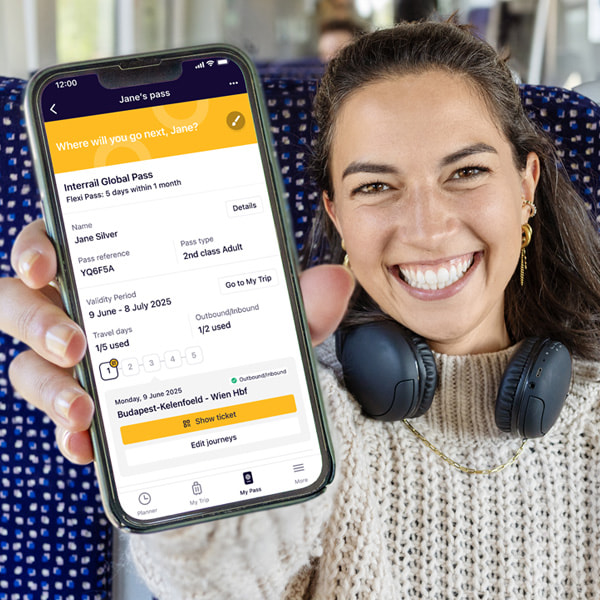
As your trip gets approaches, it’s time to get your Rail Planner app set up for your adventure. This is your essential tool for checking train times, adding your train journeys and generating day tickets (comprised of barcodes and train details generated for each day of travel) that you'll show to ticket inspectors on the train.
Keep reading to learn how to set up your mobile Pass in the app.

First, add your Pass to the Rail Planner app
Once you download the Rail Planner app, follow these steps or simply follow the link in the confirmation email we sent you when you bought your Pass.
Open the Rail Planner app and go to My Pass. Tap “Add your Pass.”
Enter your last name and Pass number. You'll find your Pass number in your order confirmation email.
Please note: You will need to enter your last name and Pass number exactly as they're stated in the confirmation email. These fields are case-sensitive. Please make sure you don't add extra spaces if you copy/paste this from the email.
Then, enter the 6-digit verification code sent to the email used to purchase your Pass. Tap “Confirm” to complete adding your Pass to the app.
Once your Pass is on your device, you can find it any time in the My Pass section of the app.
Travelling as a group? You can add as many Passes to your device as you like. It is also possible to move your Pass onto another device once it's activated for travel (Note: You may only move your Pass to another device once). If you're travelling as a group with multiple Passes on one device, you'll need to travel together on all journeys.
Travelling with children? A Child Pass needs to be activated in the same way as a regular Adult, Youth or Senior Pass and can be used on a separate device. The Child Pass should always have its own trip and tickets for inspection on the train. Children under 4 can travel with you without their own Pass — learn more here.

Next, connect a trip to your Pass. This is how you'll keep track of the train journeys you take.
Create a new trip and give it a name.
Or choose a trip that you've already created. You'll see a list of your existing trips that you can choose from. You can only connect a trip to one Pass at a time.
Do you have more than one Pass on your device? Each Pass needs its own trip, so if you've got a few Passes on your device, you’ll need a separate trip for each Pass.
It's easy to add train journeys from the planner to multiple trips at once, and you can name each trip something different to keep track of all your travels. Keep in mind, you only need one trip per Pass, which will contain your full itinerary.

The last step (before hitting the rails!) is activating your Pass.
Enter your passport or ID number. This should match the identification document that you're travelling with, as you may have to show it to ticket inspectors on board the train.
Choose your trip start date. This should be the first day you’re planning on using your Pass to travel on trains. Your Pass will be valid from this day until it expires. Choose carefully — once your chosen start date begins, it is not possible to change the validity period anymore, and your Pass will become non-refundable.
Travelling later? No rush – you can activate your Pass up to 11 months from when you purchased it. Just remember that you can't board your first train unless your Pass has been activated, and you need to be online to activate your Pass.

Step 6: Hop on the train and use your Pass and travel days
The adventure begins! Once your Pass is all set up, you can add the train journeys you plan to take. Simply search for trains using the planner in the app and save the train journeys that fit your plans to the trip connected to your Pass. If a train journey isn't listed in our timetable but is part of our Pass Network, you can add it manually.
Before boarding the train, go to your trip in the “My Trip” section of the app and tap on the train journey you’re about to take to add it to your Pass. If you’re travelling with a Flexi Pass and this will be your first train of the day, you'll need to use one of your travel days. The app will generate a day ticket consisting of a bar code for the travel day in use along with details about the train journeys you plan to take.
Reminder: In addition to your day ticket, keep your identification documents and any required seat reservations on hand to show ticket inspectors onboard the train.
Change of plans? With a mobile Pass, you can change a travel day until midnight the day before. To change your travel start date, simply deactivate and reactivate your Pass with the new start date. (Note: It may not be possible to change or cancel your seat reservations if you alter your itinerary. Learn more about our reservations refund policy.)

Step 7: Ask for help if you need it
If you run into any problems during your travels, chat with our customer service assistant Train-E or live chat with our support agents. You can also check our FAQs for further guidance.
Here are a few other resources for troubleshooting while on the rails:
Travel disruptions: Learn about any rail strikes or other train-related disruptions that may impact your travel.
Delay compensation: If you experience a train delay of 60 minutes or more during your Interrail trip, you may be eligible for compensation for the inconvenience caused.
Step 8: Keep the adventure rolling after you return home
Once an Interrailer, always an Interrailer. Relive the magic of your trip and start dreaming of your next one by joining the Interrail Community. There, you can connect with other travellers for expert advice, route ideas, destination tips and more.


Change of currency
You cannot change the currency once you have a Pass in your cart. Remove the Pass, and then change the currency on the website header.